PyQt入门1
针对工作中存在的重复性流程,将核心功能进行可视化封装,通过界面化引导执行并打包为独立的可执行程序(exe),便于快速上手、一键操作
目录
环境安装
实际使用
问题记录
环境安装:
windows:直接pip安装即可,使用百度镜像安装命令如下,此处pyinstaller模块用来将python代码打包成exe。
1
| pip install -i https://mirrors.baidu.com/pypi/simple PyQt5 pyinstaller
|
实际使用:
Step1、窗口构建
常见控件:QLabel(文本控件)、QLineEdit(输入框)、QPushButoon(按钮)、按钮触发功能实现。
以QLabel控件为例:可插入文字、图片,也可将QLabel控件插入到QLabel中叠加使用。
1
2
3
4
5
6
7
8
9
10
11
|
label = QLabel(text)
label = QLabel()
label.setText("This is a QLabel")
img_label = QLabel()
pixmap = QPixmap(img_path)
img_label.setPixmap(pixmap)
|
1
2
3
4
5
6
|
qlabel = QLabel()
qlabel.move(x, y)
qlabel.resize(w, h)
qlabel.setGeometry(x, y, w, h)
|
1
2
3
4
5
6
7
|
label.setStyleSheet("padding-left:10px; border-radius: 10px;background-color: white;")
label.setAlignment(Qt.AlignHCenter | Qt.AlignVCenter)
|
1
2
3
4
5
6
7
8
9
10
11
12
13
14
15
16
17
18
19
20
21
22
23
24
25
26
27
28
29
30
31
32
33
34
35
36
37
38
39
40
41
42
| import sys
from PyQt5.QtWidgets import QApplication, QWidget, QLabel, QScrollArea
if __name__ == '__main__':
app = QApplication(sys.argv)
scroll_area = QScrollArea()
container = QWidget(scroll_area)
not_other_num = 0
y_offset = 0
for i in range(9):
parent_label = QLabel(container)
parent_label.setGeometry(0, y_offset, 200, 50)
parent_label.setStyleSheet("background-color: yellow;")
label1 = QLabel("Label 1", parent=parent_label)
label1.setGeometry(10, 10, 80, 30)
label1.setStyleSheet("background-color: red")
label2 = QLabel("Label 2", parent=parent_label)
label2.setGeometry(100, 10, 80, 30)
label2.setStyleSheet("background-color: blue")
not_other_num += 1
y_offset += 60
container.setFixedSize(200, y_offset)
scroll_area.setWidget(container)
scroll_area.show()
sys.exit(app.exec_())
|
实现:将父级QLabel添加到一个Widget()中,然后将Widget存放到滚动区域QScrollArea里
!!!注意:当自定义设置QScrollArea大小时,QWidget大小必须大于QScrollArea大小,才能有效实现结果。
Step2、简单应用
1
2
3
4
5
6
7
8
9
10
11
12
13
14
15
16
17
18
19
20
21
22
23
24
25
26
27
28
29
30
31
32
33
34
35
36
37
38
39
40
41
42
43
44
45
46
47
48
49
50
| import sys
from PyQt5.QtWidgets import QApplication, QWidget, QPushButton, QLabel, QVBoxLayout, QLineEdit
from utils.excel_utils import numberAndCount
class MyWindow(QWidget):
def __init__(self):
super().__init__()
self.setWindowTitle('测试平台')
self.resize(640,480)
self.label1 = QLabel('Path1:', self)
self.label1.setGeometry(20, 20, 100, 30)
self.input_field1 = QLineEdit(self)
self.input_field1.setPlaceholderText("输入统计地址:./tmp_data")
self.input_field1.setGeometry(90, 25, 300, 20)
self.label2 = QLabel('Path2:', self)
self.label2.setGeometry(20, 50, 100, 30)
self.input_field2 = QLineEdit(self)
self.input_field2.setPlaceholderText("输入excel保存地址:./tmp.xlsx")
self.input_field2.setGeometry(90, 55, 300, 20)
self.submit_button = QPushButton("运行", self)
self.submit_button.setGeometry(50, 100, 70, 30)
self.submit_button.clicked.connect(self.on_button_click)
def on_button_click(self):
train_path_root = self.input_field1.text()
excel_save_path = self.input_field2.text()
numberAndCount(train_path_root, excel_save_path)
if __name__ == '__main__':
app = QApplication(sys.argv)
window = MyWindow()
window.show()
sys.exit(app.exec_())
|
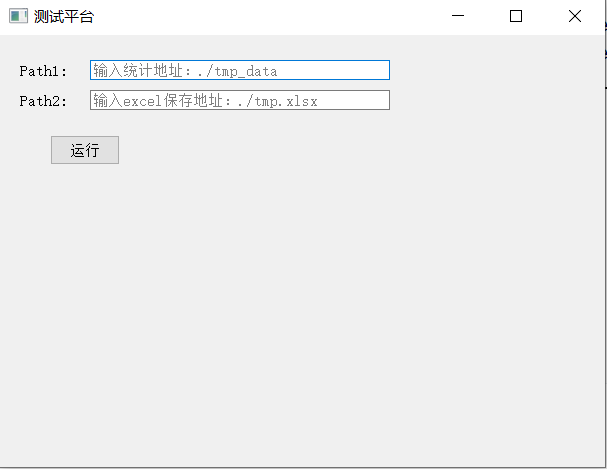
可视化界面如下:
Step3、打包exe
在目标目录打开终端,使用python的pyinstaller对.py文件进行打包,如果打包的程序是图形界面程序,添加-w,则打包后打开exe文件将只出现图形界面,命令行窗口将被隐藏。命令如下:
将在该目录下生成dist文件和.spec,exe在dist文件下。
问题记录:
主要出现在打包的时候:
问题1、打包时出现RecursionError: maximum recursion depth exceeded错误,网上搜索表示程序中包含递归函数,但经过检查后代码中并不存在.
解决:重新安装pyinstaller后解决。
问题2、使用conda环境打包时,打包后的exe文件打开后提示无法引用PyQt5。
解决:使用 –path 将pyqt5的runw.exe地址手动传入。
1
| pyinstaller --path=d:\software\Anaconda3\envs\pytorch\Lib\site-packages\PyInstal ler\bootloader\Windows-64bit-intel\runw.exe -w pyqt.py
|
版本历史
- 2024-02-20:完成文档初版
- 2024-05-05:完善文档格式及结构,添加目录